Didactic Scenarios for Digital Teaching in AGORA
Note
The following texts may only refer to AGORA, but the instructions, definitions and FAQs can be applied to all CommSy platforms (e.g. UniCommSy, EduCommSy, etc.). Here you will find an overview of all CommSy platforms at UHH. If something does not work as expected and you need technical support, please use the following button to the support form to contact your responsible DL-Office from the DL network.
Below you will find handouts on the topic of “Scenarios for Digital Teaching” on AGORA.
AGORA tutorial for an asynchronous discursive teaching scenario.
Discuss with your seminar digitally with the help of AGORA: With a few simple tricks, teachers can turn an AGORA workspace into much more than just a download folder - for example, by using the basic functions of the workspace specifically for asynchronous discursive teaching scenarios. Jan Christoph Meister, long-time project manager of the DL Office and eLearning Officer of the Faculty of Humanities (2009 to 2020), explains how and why his “construction kit” and “roadmap” transform students in his courses from passive silencers to passionate discussants online.
- to the tutorial “AGORA diskursiv” (german).
- you can find an extensive help page for AGORA in our AGORA help portal.
Workspace template for Humanities subjects
To help you get started with AGORA, we have created a modular workspace template. You can use this to create a workspace and get to know the most important AGORA functions as well as to adapt the “construction kit” of the template for your course.
Create a workspace using the workspace template
Please create a new workspace first and then select the workspace “Raumvorlage für GW-Fächer” with the workspace ID: 12551803 in the creation menu under “Template”. Detailed instructions can be found in the tutorial “Reusing content” in the second paragraph.
| Tip: If you are logging into AGORA for the first time, you can find helpful tips in our “First steps” tutorial.. |
Note: If you want to use personal workspaces to provide students with protected feedback or, for example, to conduct a take-home exam, please activate them at this point or later according to these instructions. When creating personal workspaces, we recommend selecting “No template” or the “Standard template” to keep them clear (see Fig. 1).
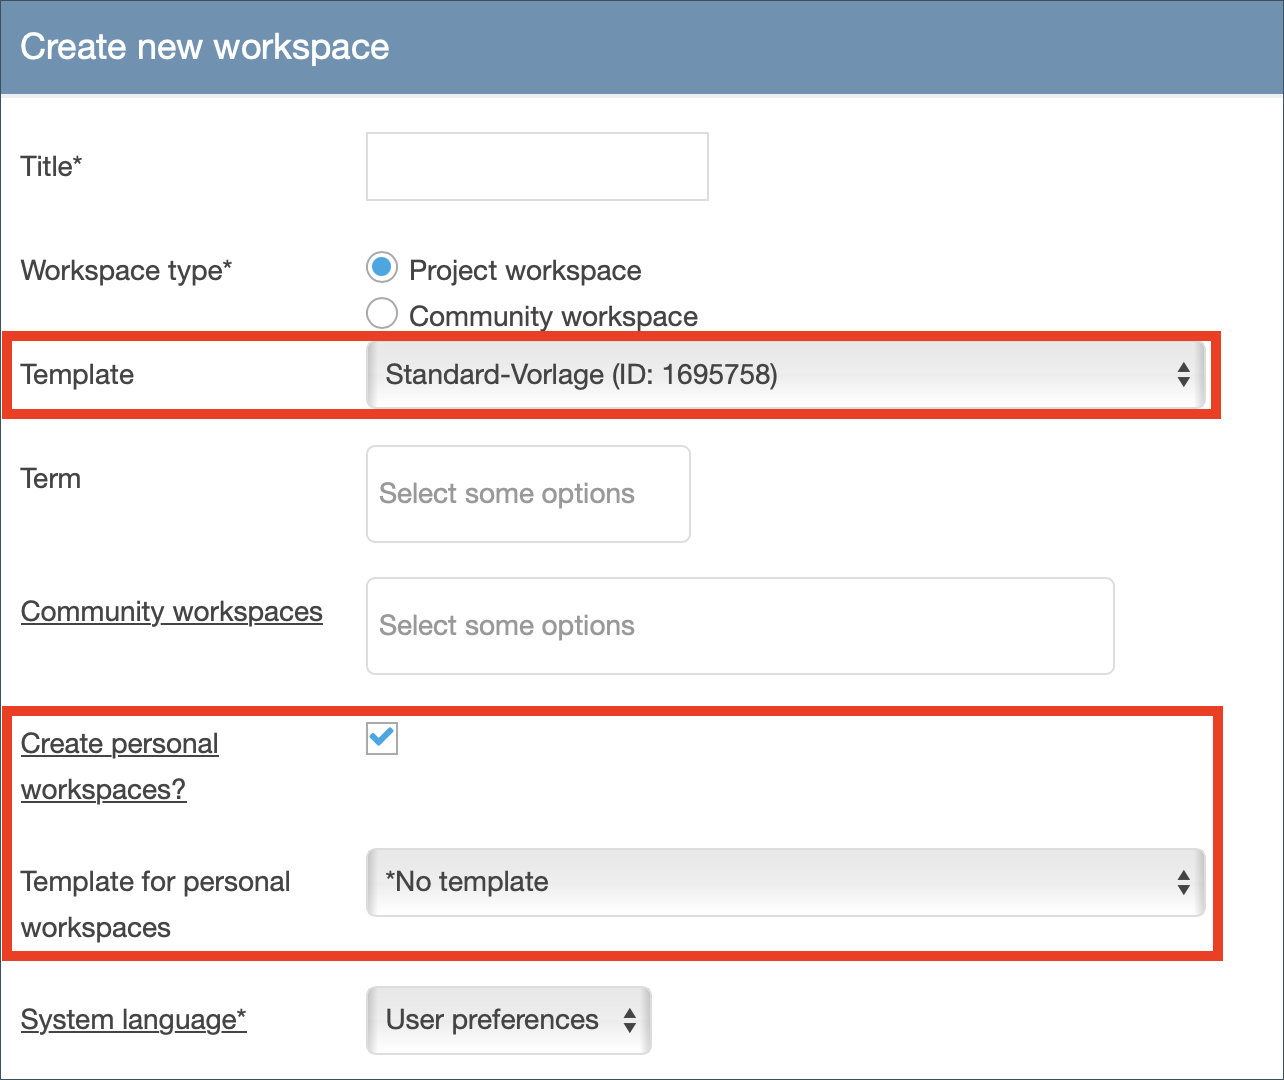
The contents of the workspace template
In the workspace you will find numerous example and explanation entries. Edit them to adapt them to your needs. You will find the following entries created:
- In the materials section, two entries contain important resources and assistance for both teachers and students to help them get off to a good start in digital teaching. You will also find a “Getting Started” guide in PDF form in English and German.
- In the same section you will find “containers” for the individual sessions, in which you can upload material to be processed or important information, for example. They are named according to the consecutive session numbers.
- There are two examples of a branched discussion in the discussion section. For more information on this topic, see the scenario “Designing digital teaching discursively”: “tutorial for an asynchronous discursive teaching scenario”.
- An exemplary tutorial group with associated workspace is set up in the group rubric.
- In the announcements section, you will find two sample entries prominently displayed on the entry page of the workspace below the UHH logo. Feel free to change the text here to communicate important, semester-related information such as office hours or zoom links, or to display recent changes.
- In the appointments section you will find weekly sample appointments that you can adapt to your event dates. It is best to apply the changes using the “Save for all dates in the series” button so that you do not have to adjust each date individually.
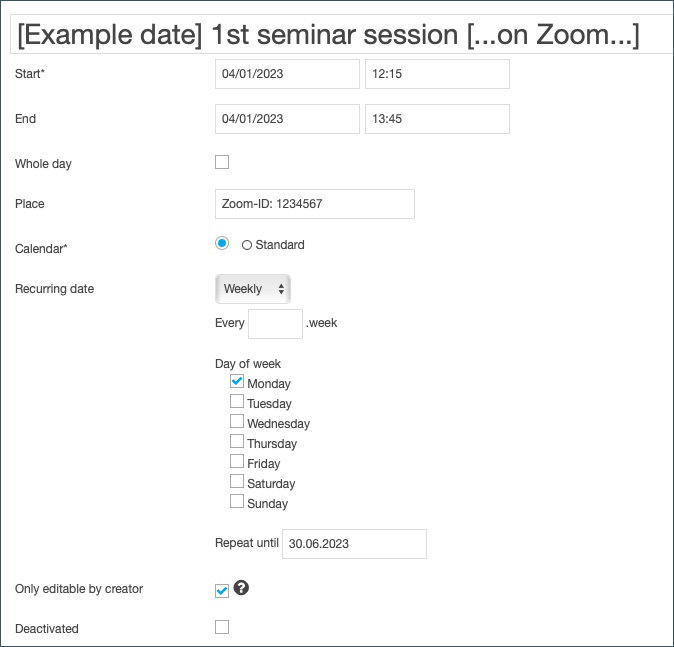
| Tip: In order to keep the workspace clear, you can also completely remove entries that are not required at any time - this primarily concerns the documents for teachers, which may be less interesting from a student's point of view, as well as the announcements. |
Take-Home-Exams in AGORA (presence exam alternative)
In order to implement exams and other examinations digitally, the function “personal workspaces” in AGORA is well suited. The procedure for preparing the digital examination is outlined here. A significant advantage for taking exams and course work in AGORA is that most students and lecturers at the faculty are already well acquainted with AGORA. For basic information about the use of AGORA, you can access our extensive AGORA help portal with tutorials and a FAQ section, for example.
Note: The scenarios described below are only working-level tips and suggestions for technical implementation. If you have any questions regarding the legal responsibility of the examiner(s) that you cannot clarify based on our explanations or on the eLearning portal website (in german), please contact the Dean of Studies Office of our faculty.
Getting started with AGORA
Employees and students of the University of Hamburg (UHH) can log in to AGORA independently using their user ID (B identifier or “STiNE identifier”).
- Go to the AGORA homepage in your browser and click on the blue “Login” bar.
- Now enter the access data of your user ID and password on the login page and click on “Login”.
Workspace opening and workspace participation for students admitted to the examination.
Step 1: You may have already opened a workspace for the course in which the take-home exam (THE) is to take place. Nevertheless, we recommend you to create a separate workspace for the execution of the exam (see also tutorial on “Opening a workspace”). This way you ensure that only those students can access the THE who are actually admitted to the exam - and not all participants of the course.
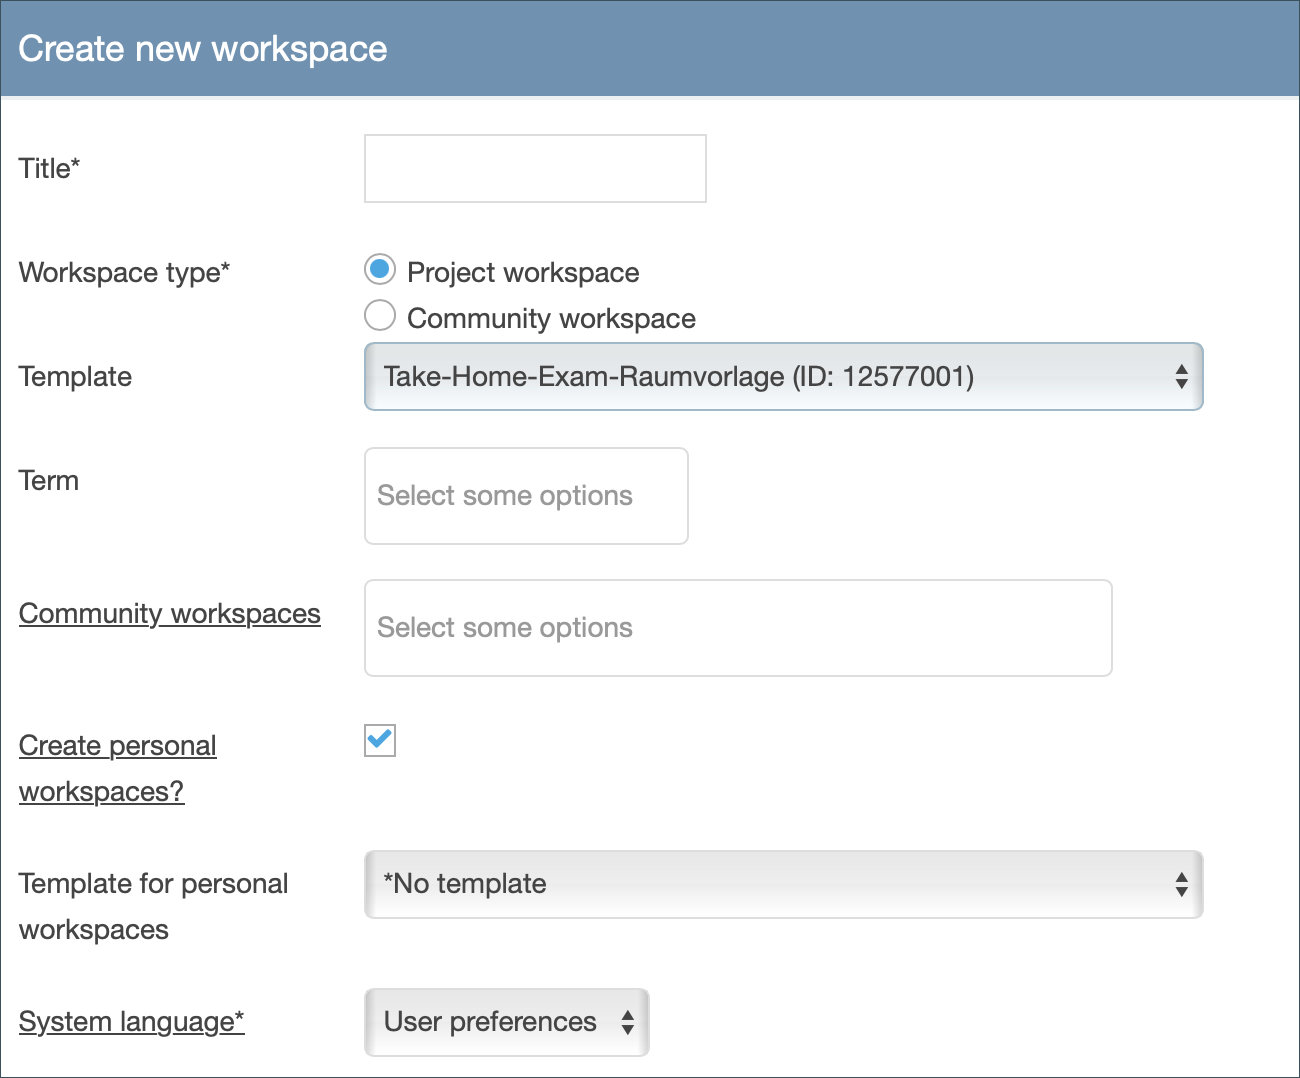
Note: Just use our “Take-Home-Exam-Workspace-Template” created for this purpose with the workspace ID: 12577001. In the course of the workspace opening you can select it in the drop-down menu “Template”. In this case, you can skip step 2.
Step 2: When creating the workspace, activate the “Personal workspace” feature, which you will find listed under the settings options. Please note that this option only appears after you have checked the “Project workspace” option next to “Workspace type” (see also tutorial on “Personal workspaces”):
You would like to activate the “Personal workspaces” feature subsequently? You can find the option here: First click on the “Settings” workspace moderation area. Then click on “Extensions”. Here you will find the option “Personal workspaces” as the first item. Check it, scroll to the bottom of the page and click “Save”.
Step 3: Now define in the “Settings” for the workspace moderation how the students can enter the THE workspace. Before announcing the workspace name to the examination candidates, consciously decide on one of the options and, if possible, stick to this one so that requests already made before the change do not come to nothing:
- Joining by application: Students can find the THE workspace as usual in the list of all workspaces and apply for membership here. You will then receive a corresponding notification by mail and can activate the requesters (if necessary, you can learn how to do this in this tutorial).
- Joining by participation code: Alternatively, you can set up a participation code for the THE workspace and share it with the exam candidates (see this guide for how to do this, if needed).
Now tell the examination candidates the workspace title and/or the workspace ID and ask them to enter the workspace promptly. It is best to give them a deadline for this.
Note: In any case, make sure that all students admitted to the exam have access to the workspace before the start of the take-home exam (after the end of the sign-in and sign-out phase).
Note: Match the AGORA list of workspace participants with the STiNE list of admitted students. To do this, open your exam in STiNE and go to the details page. Then click on “Extended list” in the “Participants” section.
Create task
AGORA is particularly suitable for the open-book scenarios described on the e-learning portal website (in german) - (website only available in german) such as essay questions. If, on the other hand, you prefer a question type-oriented query with e.g. single and multiple choice questions, assignment tasks, etc., OpenOlat is more suitable, because it provides a very large variety of question formats and their largely automatic evaluation.
First create one or more tasks on AGORA outside the target workspace, e.g. in your personal My Clipboard area. You can access this by clicking on the folder symbol in the icon bar at the top right. Afterwards, you can copy them into the respective personal workspaces of the examination candidates by means of a so-called mass action.
Note: Alternatively, you can create a task that is to be worked on by everyone in a material entry in THE workspace (i.e. not in “My repository”). In this case, skip the following section “Assign task”.
First, go to the “Tasks” section under “My Clipboard”, your personal area. There you can create the task as an entry and set the access rights and visibility according to your needs. The “New entry” function, which you can find in the action menu in the top right corner of the edit line, allows you to create the new entry. At this point you can also edit the deadline end under “Due on” and the intended processing span under “Planned time”.
Note: The deadline entered is to be understood as a hint for the exam candidates. It does not prevent solutions from being uploaded or edited later. If necessary, inform your students in advance that you will not accept examination results posted after the deadline. To prevent subsequent editing, please follow the instructions described below in the section “Archiving and Assessment”.
Consider different submission deadlines to compensate for the disadvantage of limited examination candidates.
- Option “Editable by creator only”: If you check this box, you ensure that only you (and possibly other workspace moderators) can edit the entry. This prevents other participants from accidentally or intentionally editing or even deleting the entry.
- “Deactivate” option: If you check this box, the entry will only be visible to you. It is hidden for all other participants.
- Option Activation date: If you also enter the date and time behind “Deactivated until”, your entry will be automatically activated at the selected time and displayed in the list for all workspace participants to see. You can either enter the desired date and optionally a time manually or select it by clicking on the desired date in the calendar or time context menu that appears.
We recommend always using these three settings in the context of exam-like scenarios.
Now, either type the task in the text box or upload a file with the task.
Here is an example for the prototypical provision of a task:
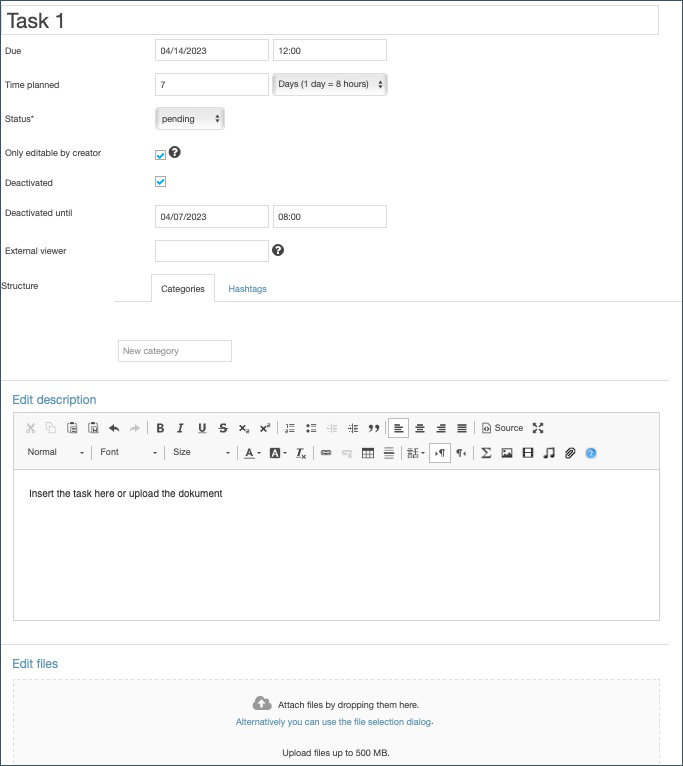
Assign tasks
After you have created the task in your personal “My stack” area, you can insert it into the personal workspaces of the exam candidates by means of a so-called mass action.
- Click in “My stack” in the “task” section on “choose action” . Click on “Add to 'Marked entries' ” and now select the desired entry that you want to copy and confirm the selection with “Execute action”. The entry is copied in “Marked entries”.
- Now go to the project workspace in whose personal workspaces the entry is to be inserted. Go to the “Users” section.
- Under “Choose action”, select the option “Insert marked entries into personal workspace”. Select all persons to whom the entry is to be made available and confirm with “Execute action”.
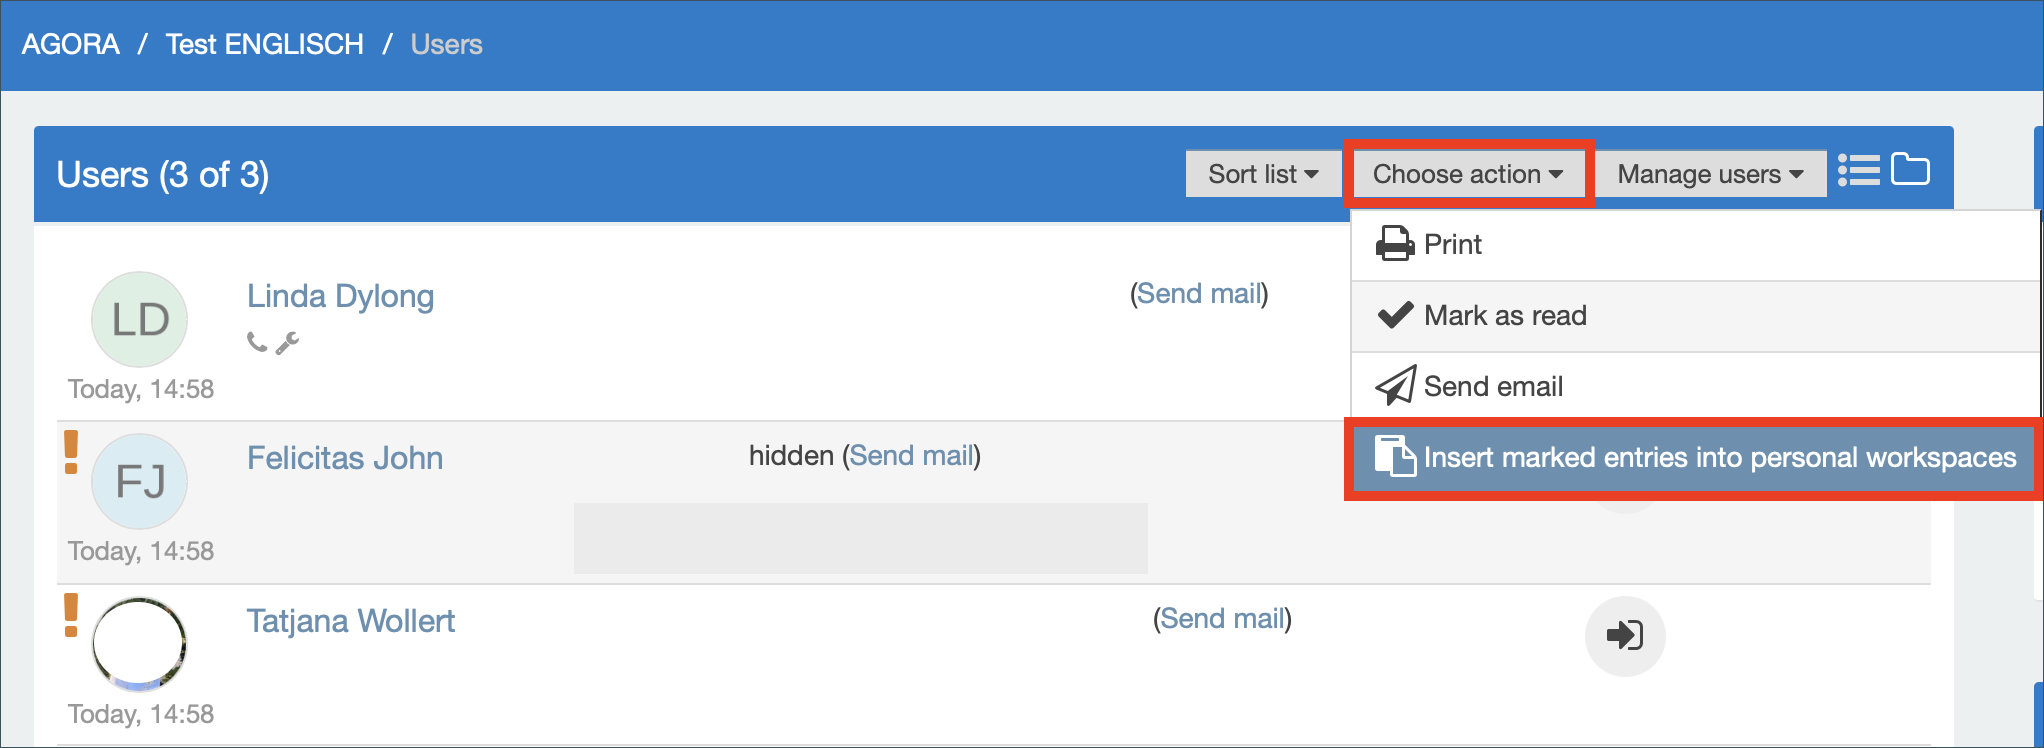
Note: You can also copy content to individual personal workspaces. If you want to use different variants (e.g. Task A - Task B), you can thus assign them to the respective examination candidates.
Enable protected submission
To implement a protected submission, where only you as the instructor and the individual students have access to the uploaded files, use the function of the personal workspaces. You have either created these with the creation of your THE workspace, as described above, or you use the workspace template (ID: 12577001), where this function is already activated. To enter a person workspace, click on the “People” section in the left margin. The list of workspace members will appear. Next to each workspace member there is an icon for entering his or her person workspace.
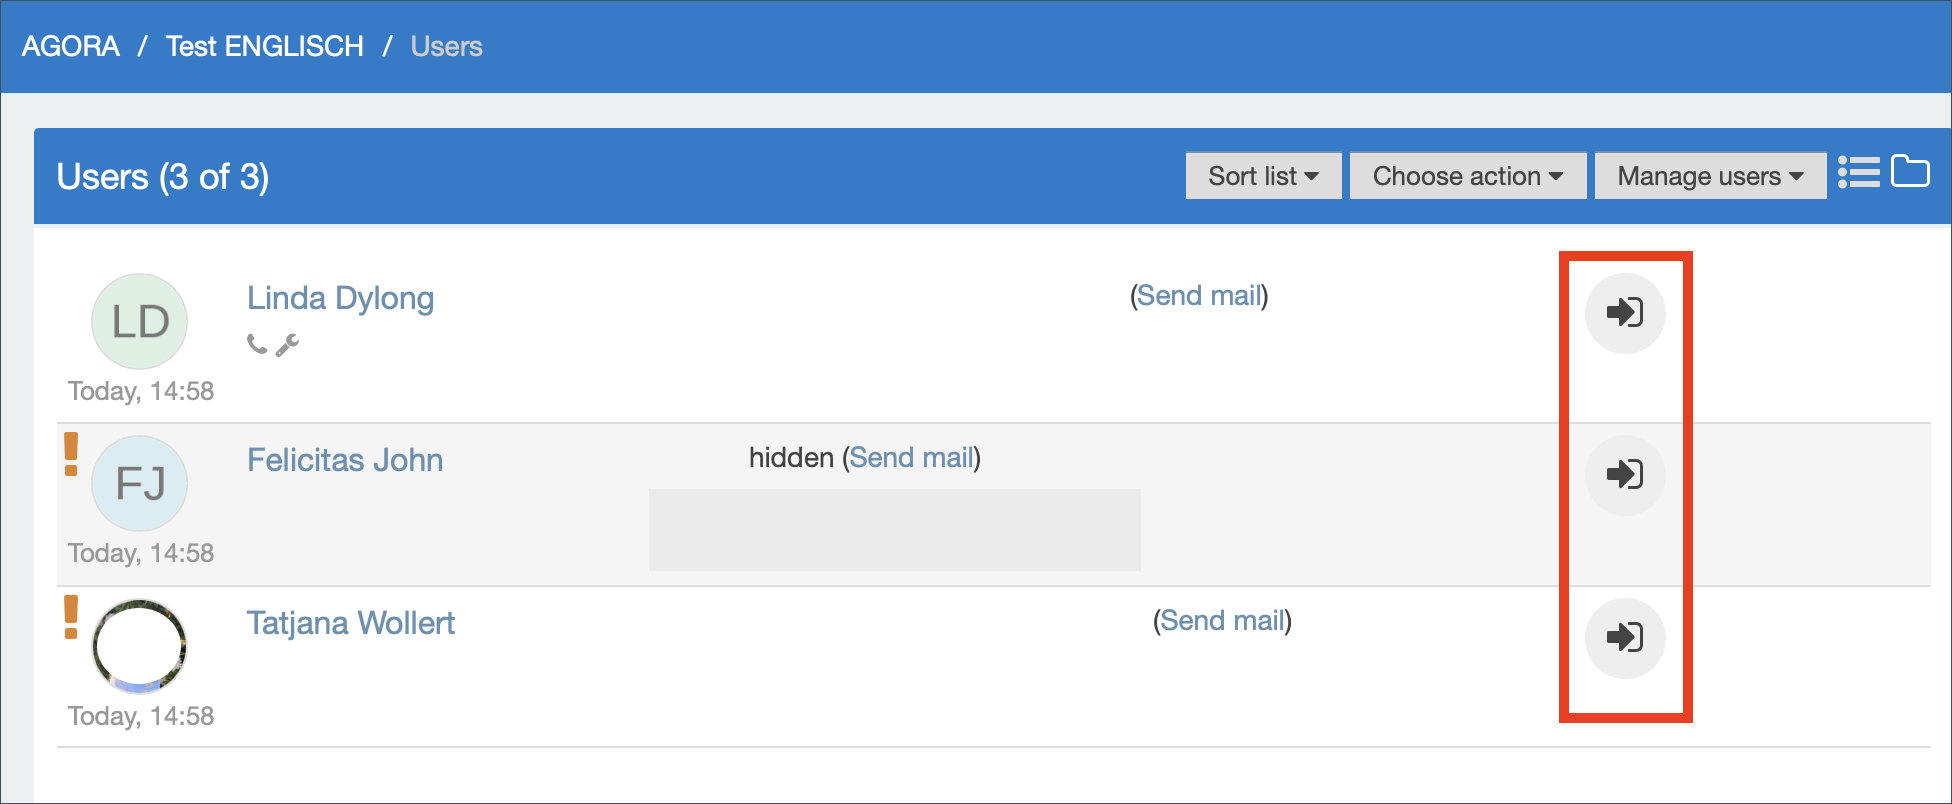
Here, students can complete the submission - preferably not by typing in the editor, but by uploading a document, preferably in PDF format.
| Tip: You can find a detailed tutorial on how to use the personal workspaces in our AGORA help portal. |
Declarations of autonomy
At the top right of this page, under “Download”, you will find two suggestions for self-declarations that you can request from your examination candidates*. The two variants differ as follows with regard to the aids used:
- Variant 1: I, first name last name, hereby certify that I have completed this examination independently and exclusively using the permitted aids.
- Variant 2: I, First Name Last Name, hereby certify that I have written this examination paper independently and exclusively using the sources listed in the bibliography.
You should provide the self-declarations to students ahead of time so that the time does not subtract from the assignment completion time. When submitting, students then upload this document along with the actual assignment processing.
Note: In the workspace template described in the last section below, both documents are uploaded in one material entry. Delete the variant you do not want there before you name the workspace to your students.
In general, you as the examiner can decide yourself whether you want to use other formulations. However, the suggestions in the PDF forms are in accordance with the examination regulations. This procedure has been agreed in principle with Unit 31: Quality and Law.
End of processing and evaluation
From a technical point of view, if you want to ensure that the exam documents are not processed after the deadline, you should “freeze” the THE workspace, so to speak. The following options are available for this:
- Change the status of workspace members: Assign the status “Reading user” to all or only individual workspace members immediately after the deadline (more information “Opening a workspace”). The advantage of this option is that you can do this later for individual workspace members if necessary - very practical, for example, in the case of disadvantage compensation. Also, you and other workspace moderators are still allowed to edit the workspace.
- Workspace archiving: You can also set the entire THE room to “archived” immediately after the deadline (see our “FAQs” for instructions). However, no one - neither a “user” nor the “room moderator” - will be able to make any changes; i.e., corrections to the tasks will no longer be possible in this room. All further information on room archiving and deletion can also be found in the “FAQs”.
Note: We strongly recommend that you also save all relevant files locally on your computer. For this purpose, download the examination performance from the respective personal workspaces from the submission entry.
AGORA cannot automatically evaluate and grade the examination results that have been entered; this is the responsibility of the lecturers. Go to the individual personal workspace to evaluate the files and download them if necessary. Comments that you make there are protected and only visible to the respective examinee and you or other workspace moderators.
Note: All members of the workspace moderation have access to the personal workspaces. So if you are doing the assessment with support, simply assign the status “Moderation” to the proofreaders to allow them access to the submitted documents (You can find instructions on how to do this under “Personal workspaces”).
Workspace template
The workspace template for THE mentioned above can be found under the name “Take-Home-Exam-Workspace-Template” with the workspace ID: 12577001. In it, the function “Personal workspaces” is already activated and a sample task is created with the required settings. You will also find two samples for self-declarations there.
Note: We recommend that you carry out a test run of the THE with the test participants in advance in order to avert possible stumbling blocks and uncertainties.
Tip: If you have any questions about AGORA and take-home exams at the Faculty of Humanities, please feel free to contact the DL office team at agora@uni-hamburg.de and find out more about digital teaching on our website. You can find more information on the topic on the website of the DL-Portal of the e-network at University of Hamburg. If you have questions regarding examination law, please contact your responsible study office or the Dean of Studies.
