Reusing content
Once you have been working with CommSy for a while, you may find that you want to keep using your own content again and again without having to create new entries or uploading the same files from your computer each time.
Perhaps you have created content that you are not going to use again during the current semester, but you wish to keep it around anyway—such as study material for students before their exams. CommSy offers useful functions to help you with this.
- Creating a workspace template: This function allows you or other colleagues to reuse the content of an entire workspace. Users opening a new workspace will be able to select the template you have created. All content will be copied from the old workspace to the new one.
- Copying content: This function allows you to duplicate content, such as announcements, dates, or materials, from one workspace to another.
- Storing content in your stack: Your stack is a place where you can collect, create, and copy content. Only you can access your stack.
- Creating a new project workspace: You can collect materials and other content in a project workspace created for that specific purpose.
1. Creating workspace templates
Workspace templates are especially useful for classes that have similar content each semester, such as introductory lectures. The template function allows you to copy entire workspaces rather than individual entries.
Once you have created a workspace template, you can select it when creating a new workspace later. All content and settings of the existing workspace will be copied to the new workspace, with the exception of personal data.
Creating a workspace template: Enter the project workspace you want to use as a template. Open the settings. Click the third menu point “Additional”; Scroll down to the “Template” section.
Check the box next to “Provide this workspace as a template for new workspaces” (Fig. 1). Now, choose your “target group” from the dropdown menu below. This specifies who can use your template: only you (the moderator of the “old” workspace), all users of the workspace, or all users of CommSy.

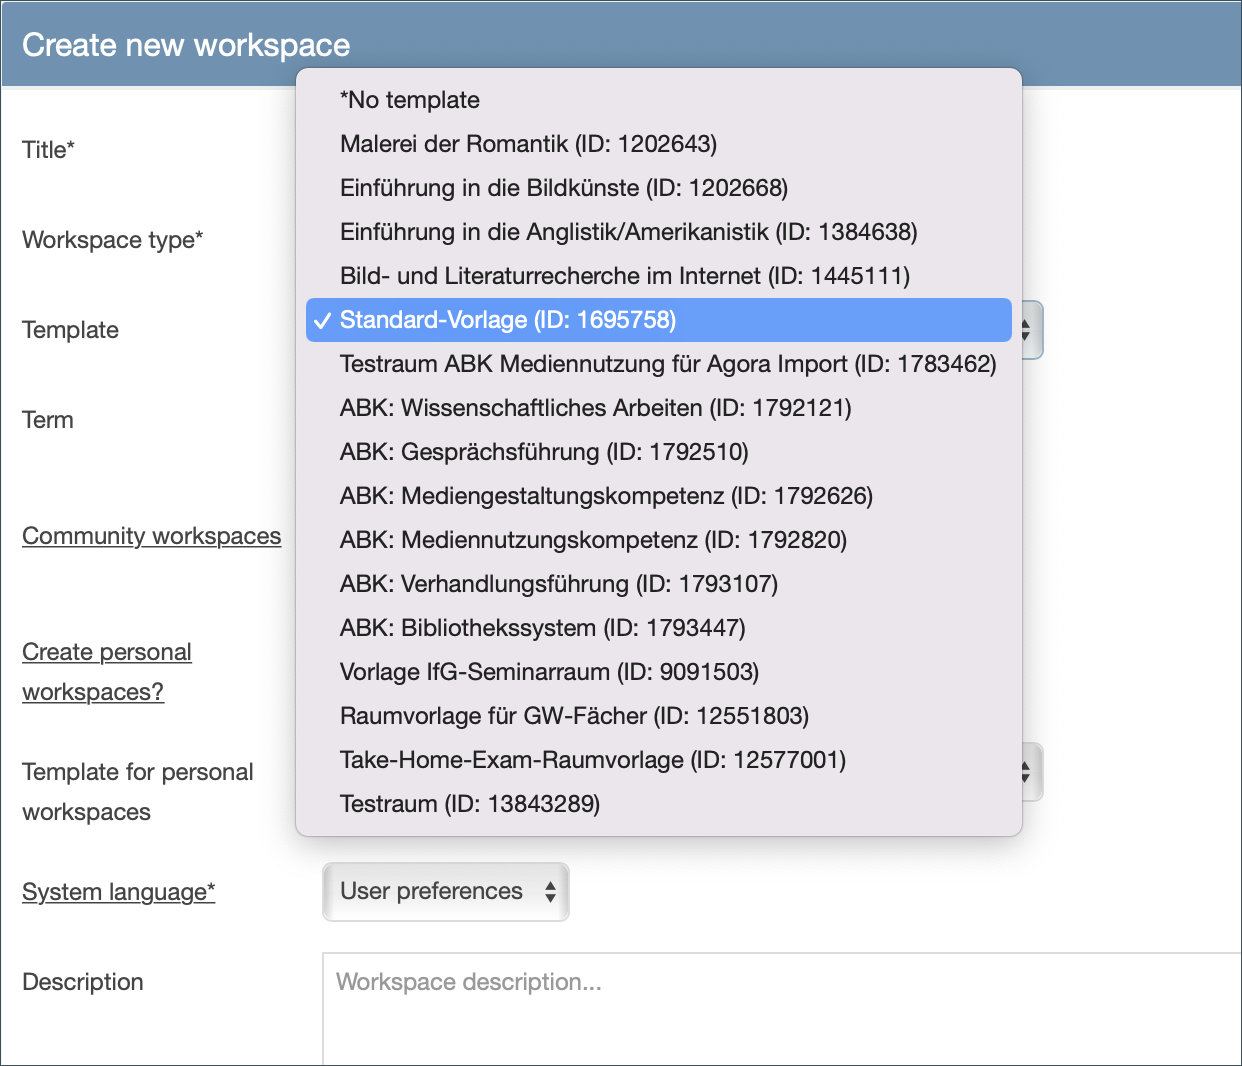
Creating a new workspace from a template: Once you have saved your template, you can use it when creating a new project workspace. To do this, select the name of the template from the dropdown menu (Fig. 2).

Project workspaces created from a template have exactly the same functions as any other project workspace. You can add new content and edit/delete existing content as usual.
If you create links within the workspace template (e.g. refer to a material entry in the “Welcome” header), these links will not be adapted in the workspaces created on the basis of this template. Links within a project workspace refer exclusively to the original workspace. This is only the case for references within the workspace; external links and references are adopted without any problems.
| Note: When you duplicate a workspace that has a membership code, this setting will not be copied. Here you have to generate a code again so that the students can have access to the workspace. |
2. Marking content
Use the “Mark entries” function to copy content entries (such as announcements, dates, or materials) from a workspace to the “Marked entries” section in the CommSy bar. From there, you can insert it into the same rubric of other workspaces. The following section will explain this function using the “Materials” rubric as an example.
Marking content:
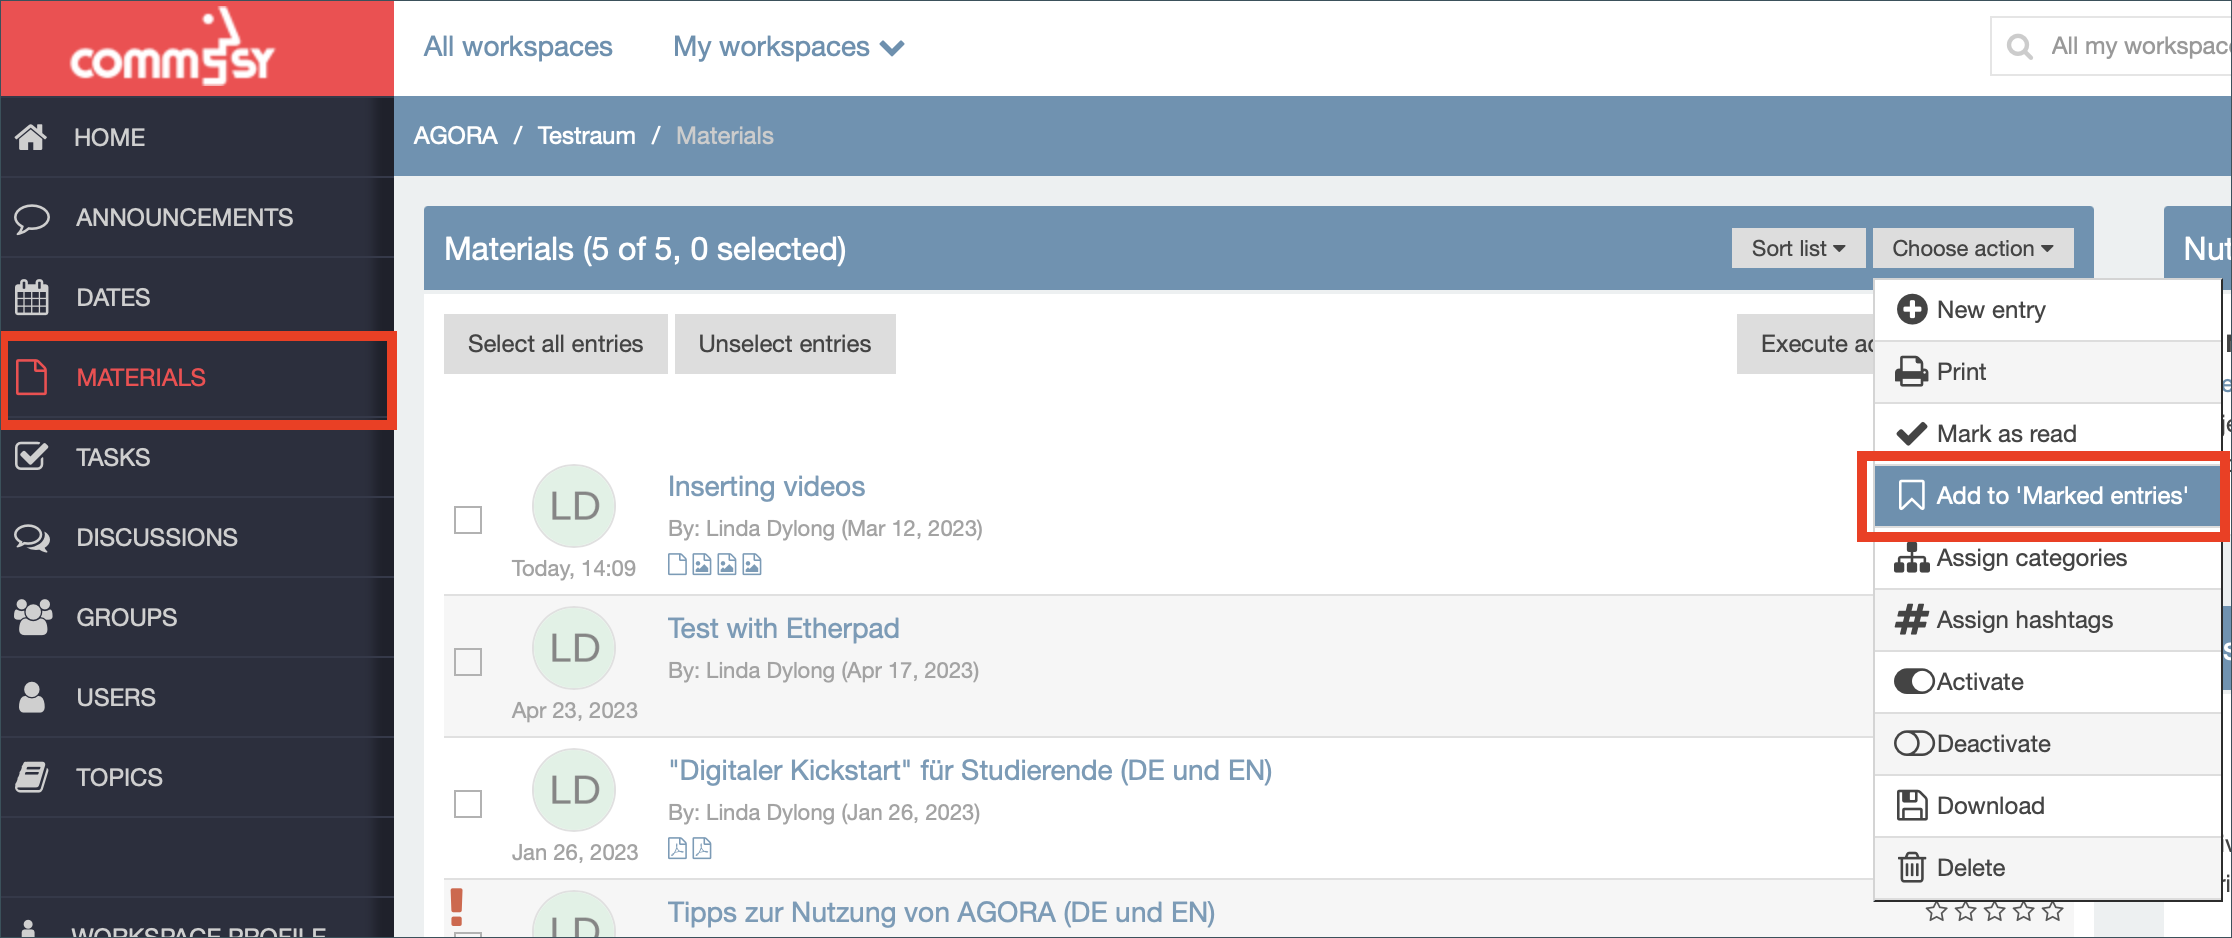
- Open the workspace and navigate to a rubric, such as “Materials” (used here for demonstration purposes).
- In the top right, open the dropdown menu labeled “Choose action” and click “Add to ‘Marked entries’”.
- Check the boxes for all entries you wish to mark. To mark everything, click “Select all entries” on the top of the list.
- Click “Execute action” on the right.

You can access your copies by clicking the “Marked entries” icon in the CommSy bar (Fig. 4). The small number displayed next to the icon tells you how many copies you have saved.
| Tip: You can also open the detail view of an entry and click “Add to 'Marked entries’” in the “Choose action” menu to add the entry to “Marked entries.” |

Inserting marked content:
- Navigate to the workspace and rubric in which you want to use your marked entries.
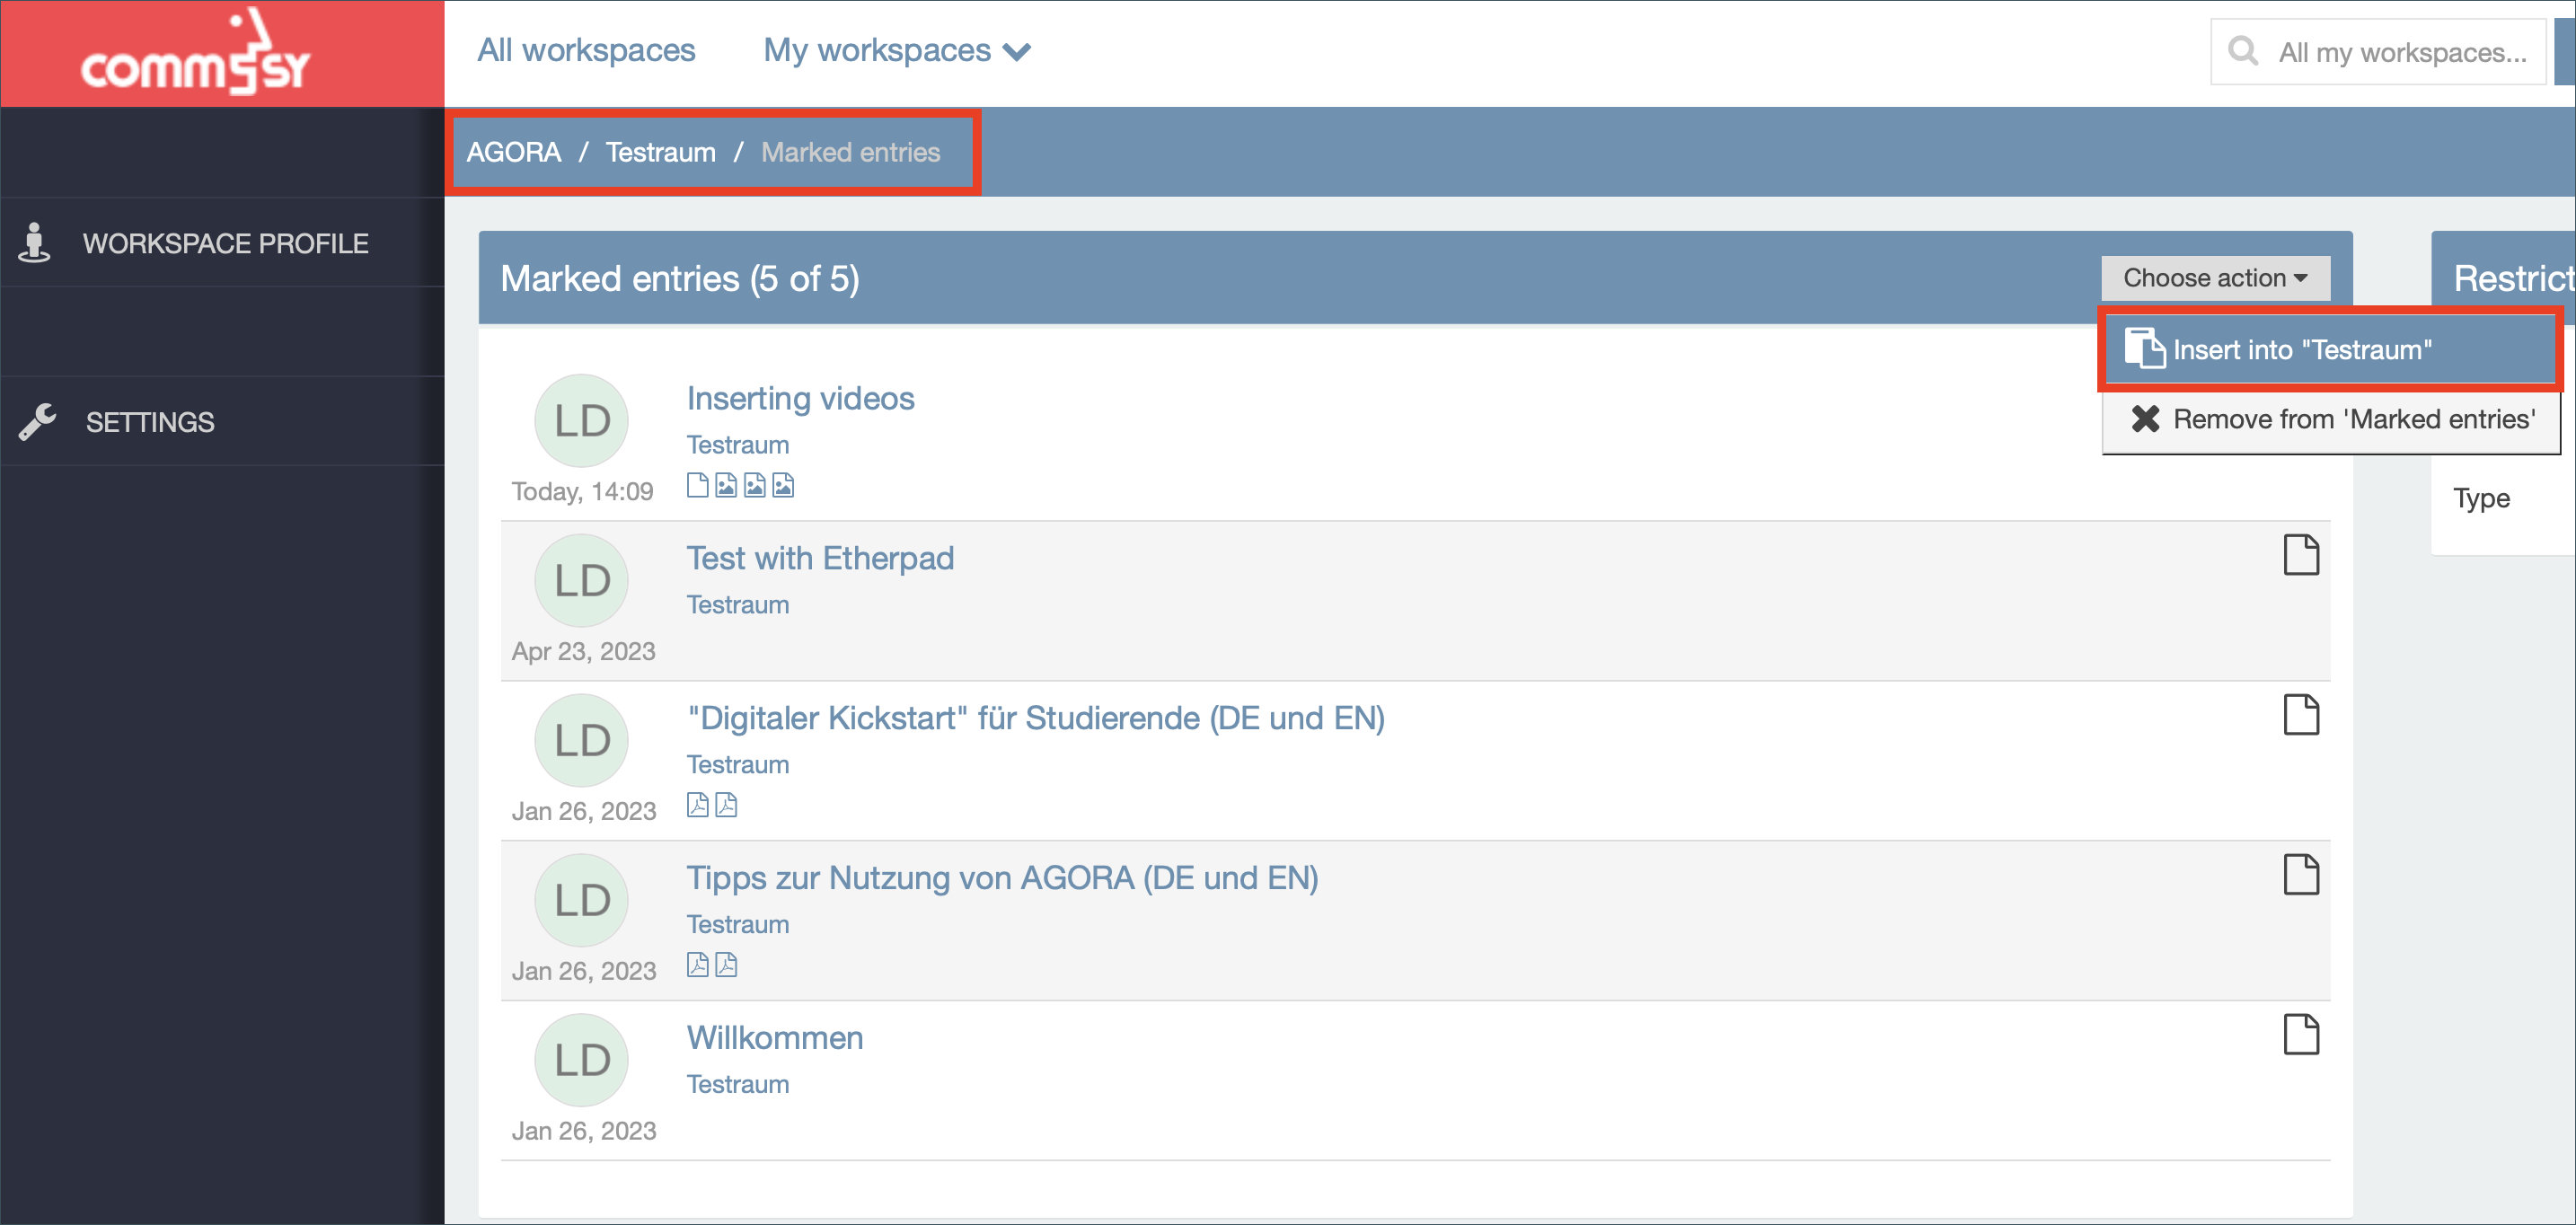
- Now, click the “Marked entries” symbol in the CommSy bar (Fig. 4). You will see a list of your marked entries, sorted by workspace and rubric.
- Select “Insert into [name of workspace]” from the dropdown menu (Fig. 5).
- You can select individual marked entries to insert into the target workspace or use “Select all entries.” Confirm by clicking “Execute action.”
- The marked entries are now available in the target workspace.

3. Storing content in your personal stack
You can access your personal stack by clicking the folder icon to the left of the dashboard icon in the CommSy bar. The stack page has a list of rubrics on the left. They allow you to create materials or other entries without publishing them in a workspace. You have access to all the usual functions here: adding files, inserting media, and so on.

Any materials added here can be copied and inserted into other workspaces as usual. You can collect important materials in your stack and access them whenever needed (see Section 2: “Marking content”).

You can share specific entries from your stack with certain people on AGORA, e.g. to allow an uncomplicated exchange of files between fellow students or colleagues. You can find instructions on how to do this in our FAQ: How can I grant access to entries for specific people on AGORA?
| Tip: If you have complex collections of materials or wish to share your collection with other users, the stack function will be unsuitable. In this case, it is advisable to collect your content in a separate project workspace instead. |
4. Creating a new project workspace
Of course, you can also create a new project workspace and use it privately to store your own content. To do this, go to the “workspace overview” and select “Create new workspace” on the right side, then select “Project workspace”. Give your workspace a name, click “Save” and use it as a personal space to store your content. You can also copy entries from your workspace and insert them into other workspaces later.
For more information about opening your own project workspace, read the tutorial “Creating a new project workspace”.
